My previous post describes the normal operation of Offline Files. And most of the time, “it just works.” But there are times when it won’t, and getting it running again can be challenging.
Two Important concepts
First, it’s important to understand that the Offline Files facility is providing a virtual view of the network folder to which Documents has been redirected when Windows detects that the network folder is unavailable. This means that, when Offline Files is really borked, users can see different things in their Documents folder depending one whether their computers are online or offline.
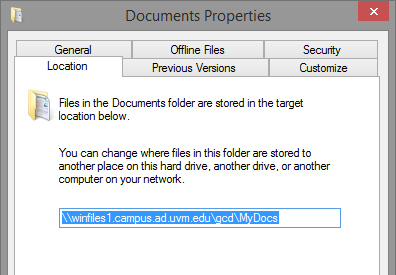
Second, Windows treats different names for the same actual server as if they are different servers altogether. Specifically, Windows will only provide the Offline Files virtual view for the path to the target network folder. You can see the target folder path in the Properties of the Documents folder.
For example, these two UNC paths resolve to the same network folder:
\\files.uvm.edu\rallycat\MyDocs
\\winfiles1.campus.ad.uvm.edu\rallycat\MyDocs
If the second path is the one that is shown in the Location tab in the properties of the Documents folder, then you will be able to access that path while offline, but not the first path.
Show me the logs
There are event logs that can be examined. I’ll mention them, but I’ve rarely found them helpful in solving a persistent problem. If you want to get the client up and running again ASAP, skip ahead to the Fix it section.
There are some logging options available that can help in diagnosing problems with offline files. There are two logs that are normally visible in the Windows Event Viewer, under the Applications and Services logs heading:
- Microsoft-Windows-Folder Redirection/Operational
- Microsoft-Windows-OfflineFiles/Operational
In addition, there are some logs that are visible only when you enable the Show Analytic and Debug logs option on the View menu. Specifically, the Microsoft-Windows-OfflineFiles/SyncLog, once visible and then enabled, seems as though it should be helpful in troubleshooting problems. However, mostly it just shows the same errors and messages that you see in the Sync Center results.
Just tell me how to fix it
If someone has errors in their Offline Files results, and some basic troubleshooting hasn’t resolved the issue, the following procedure should restore Offline Files functionality while preserving any unsynced data in the Offline Files cache.
Preserve the current contents of the Offline Files cache
Disable ALL network connections, Ethernet and Wi-Fi. That way, you will be able to operate on the Offline Files cache, rather than the live network folder.
Copy the contents of the Documents folder to a local folder, e.g., C:\temp\MyDocsCopy. YOu can do this with the GUI, or use a command-line tool like xcopy, robocopy, or PowerShell:
Copy-Item \\winfiles1.campus.ad.uvm.edu\rallycat\MyDocs -destination c:\temp\MyDocsCopy -recurse -force
xcopy \\winfiles1.campus.ad.uvm.edu\rallycat\MyDocs c:\temp\MyDocsCopy /S
Reset the Offline Files cache
I’ve described the procedure to reset the Offline Files cache previously. Please note that this will reset the cache for all users of the computer. If there are multiple users, make sure that the other users’ data is syncing safely, or if not, make local backups for each.
The brief version is that you add a single registry value and reboot. You can use the following command, run from within an elevated command prompt:
REG ADD "HKLM\System\CurrentControlSet\Services\CSC\Parameters" /v FormatDatabase /t REG_DWORD /d 1 /f
After setting this value, you need to reboot the computer to complete the reset operation. Once you reboot, re-enable your network connections so that your computer can recreate the local Offline Files cache. I usually make sure I’m using a wired (Ethernet) connection, since I may have to sync several Gigabytes.
Compare the Copy to the Network folder
The local copy you made should contain any unsynced data that was stuck in the Offline Files cache prior to the reset operation. You can use a directory comparison or sync tool to identify any such data, and save it to the network folder.
FreeFileSync is a popular open source tool for directory comparison and syncing. You can also RoboCopy or any other tool with which you may be familiar for syncing folders. A full description of these tools is beyond the scope of this article, but some quick examples follow.
Using FreeFileSync
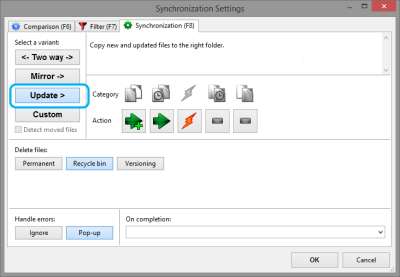
I’ve added my local copy of the Offline Files cache (c:\temp\MyDocsCopy) to the left pane and the folder redirection target to the right pane of FreeFileSync. I’ve also clicked the gear icon and set the Synchronization mode to Update. In this case, I just need to copy any new or updated files from my local copy to the network folder.
I always do a comparison or listing before making any actual changes. This avoids much heartache. For that reason, I hit the Compare button to begin the analysis and report what files will be updated.
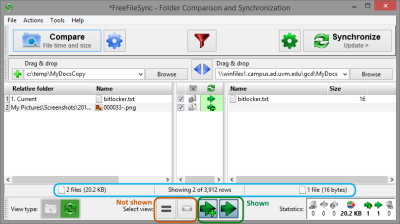
The FreeFileSync interface shows a quick summary of the count and size of files and folders that will be synced, as well as the files that will be overwritten (updated) on the destination. I have turned off the display of files that won’t be copied by clicking the right button highlighted in orange at the bottom of the window.
You can get lots of information by hovering over the files on each pane. If the actions displayed look appropriate, go ahead and click the Synchronize button.
Using robocopy
If you don’t mind (or prefer) a command-line interface, or if you don’t want to install additional software, you can use the robocopy [more] command, which comes with Windows. The format of the command is:
robocopy <source> <destination> [<options>]
The most important option to add is /L which makes robocopy LIST the files and folders, but not actually copy anything. I use this option to make sure I get the correct behavior in the list-only output before I very efficiently inflict injury to my data. The options I use in the command example below, which you have to scroll sideways to see, are as follows:
| option | description |
|---|---|
| /L | List-only mode; don’t add, delete or modify any files |
| /S | process (non-empty) Subdirectories recursively |
| /XO | eXclude Older files (existing in both places, but file in source is older) |
| /XX | eXclude eXtra files and folders (files and folder that exist only in destination) |
| /NDL | No Directory Logging (default is to log filecount for each directory processed) |
Here’s the command as it executed against the same folders as FreeFileSync above:
C:\Users\gcd>robocopy c:\temp\MyDocsCopy \\winfiles1.campus.ad.uvm.edu\gcd\MyDocs /L /S /XO /XX /NDL

-------------------------------------------------------------------------------
   ROBOCOPY     ::     Robust File Copy for Windows
-------------------------------------------------------------------------------

  Started : Thursday, December 18, 2014 11:13:35 AM
   Source : c:\temp\MyDocsCopy\
     Dest : \\winfiles1.campus.ad.uvm.edu\gcd\MyDocs\

    Files : *.*

  Options : *.* /NDL /L /S /DCOPY:DA /COPY:DAT /XX /XO /R:1000000 /W:30

------------------------------------------------------------------------------

            Newer                     38        c:\temp\MyDocsCopy\1. Current\bitlocker.txt
            New File               20652        c:\temp\MyDocsCopy\My Pictures\Screenshots\2014-12\000033-.png

------------------------------------------------------------------------------

               Total    Copied   Skipped  Mismatch    FAILED    Extras
    Dirs :       310         0         0         0         0        17
   Files :      3100         2      3098         0         0        63
   Bytes :   7.013 g    20.2 k   7.013 g         0         0   10.66 m
   Times :   0:00:03   0:00:00                       0:00:00   0:00:03
   Ended : Thursday, December 18, 2014 11:13:38 AM
Line 17 shows a file that exists in both places, but is newer (more recently modified) in the source folder. Line 18 shows a new file, one that isn’t present in the destination. Lines 24 and 25 show a summary of files and data that are listed. All this data corresponds to what was shown in the FreeFileSync utility.
If you want to perform the file sync, remove the /L option and run the command again.
Cleanup
Once all the data is safely in the network folder, you can remove the local copy. Or, if you’re like me, you can leave instructions for the user to remove the folder when they’re confident that things are working again.
I hope this guide is useful. If you run into any problems, or have suggestions on ways I can make this guide more helpful, please let me know.
2 Comments